Context: This was my first time teaching an online lecture. It is a graduate course in mechanical engineering (ME 538, Compliant Mechanisms) with 31 students enrolled. The intent was to experiment with several teaching modes, so it included regular lecture, PowerPoint slides, student participation with them sharing video and answering questions, annotations on a PDF, showing video, and writing on a “whiteboard.”
Preparation
In addition to preparing the regular lecture content, I learned to use Zoom, including switching screens between slides and video, using “Whiteboard” to annotate online to replace a chalkboard, and the “raise hands” and “chat” features for student participation. I practiced with a teaching assistant acting as the student which helped work out some bugs. It would be easier if I wasn’t trying so many features. I assume I’ll be able to leverage this work and that future lectures will take less time.
Lessons Learned
- It was very helpful to have a teaching assistant help me test the system.
- It would be easier to try fewer teaching modes for any one lecture.
Set up
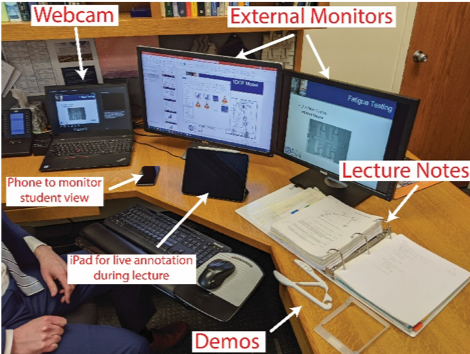
I was in my office with a laptop and two external monitors, an iPad, and an iPhone. My laptop had a webcam that was used for video and the other monitors had a PowerPoint presentation, a PDF file, and videos.
Lessons Learned
- Having one external monitor was helpful, the second was distracting.
Lecture
The lecture in Zoom was like any video chat but with a lot of people on the call. This is the easy part. Go to zoom.byu.edu for downloading the software and training. You can also find a tutorial at https://go.byu.edu/zoomtraining.
Lessons Learned
- A teaching assistant was in the same room during lecture and it was very helpful.
- If you can’t have a teaching assistant there, setting up another device to show the student view can also be helpful (but it is one more thing to keep track of during the lecture).
- If multiple connected devices are in the same room on the same call, there may be audio feedback issues. To avoid this, make sure that if the microphone of one device is active, the audio of all other devices in the room are muted.
Slides
Switching to PowerPoint slides was done by clicking on the “Share Screen” button and choosing the screen with the slides. Close all the windows you won’t be using to avoid the problem I had of trying to choose the right screen from too many choices. In the dialog box below, by selecting “Screen 1” or “Screen 2” (the number of these depend on the number of external monitors connected) the students will see everything open on one screen/monitor. Otherwise, you can select a single window/application and the students will only see that regardless of its position on the monitors.

Lessons Learned
- Close everything on your computer except what you will need for class – it will be much less distracting.
- Choose the screen to display rather than a window – this reduces the number of options and is less distracting.
Videos
The videos work okay but tend to be a bit choppy. Ideally these would have been embedded in the PowerPoint because the separate videos required switching screens again.
Lessons Learned
- In the switching screens dialog, there is a checkbox to “optimize screen sharing for video clip.” This should help improve quality during the live lecture.
- If you are showing a lot of video, a recorded lecture will likely result in higher quality video.
Student Participation
Have the students begin the session by clicking on the Participants and Chat tabs on the control bar. They can “raise hand” by clicking on the raise hand button on the bottom of the participants page. Participants who raise their hand will rise to the top of the participants list and will show a blue hand. You can unmute them and let them ask their question or answer your question. They can also use their webcam video along with the audio. You can then “lower” their hand after their question is asked, or they can do it themselves.

Lessons Learned
- Experiment with raising hand or chat before the class.
- Instruct students how to raise and lower their hands and pause longer than usual after your question to give them time to raise their hand.
Whiteboard
You will need hardware that will let you annotate. My laptop doesn’t have a touch feature, so I used an iPad. I made the iPad a co-host by selecting that window in the Participants list, selecting “more” and enabling it to be a co-host. To switch to the iPad, I selected “Share” on the iPad Zoom control pad and selected “Whiteboard” from the pull-down window.
Lessons Learned
- Be prepared to lose your annotations when you switch out of whiteboard (maybe this can be avoided but I didn’t find it).
Annotations: In addition to the whiteboard, I was also able to do annotations on a PDF file. I was sharing the content of an external monitor but since my iPad was a co-host, I could write using the iPad and it showed up on everyone’s screen.
Student perception: 30 of the 31 students attended the live lecture, which was higher than expected but was probably because of the novelty of it at the time. I asked them to rate various parts of the lecture on the scale of Great, Fine, Poor, Didn’t Work. The majority of students ranked the PowerPoint slide presentation and regular lecture part as Great and showing video as Fine. They rated the Whiteboard presentation as Fine but it was the only part that some students rated as Poor.
Other notes: The advantage of the live session was that it enabled student participation and had the feel of a regular class period. The disadvantage was that there were a lot of things that I had to track at once, which made it difficult for smooth transitions between activities.
Larry Howell
Brigham Young University
March 2020